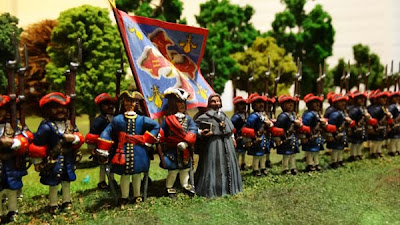
Here is the latest regiment of my home cast 35mm
figures - my Glorious Obsession. I asked my buddies if they wanted to give me the details for their own regiments. This is Steve's regiment. Steve described what he wanted the
coat and facing colors to be and gave me an idea what he wanted on the flag
(which after making it I stupidly put on upside down - but I will fix this). The coat and facing
colors are actually a real regiment - the Regiment of the Constantinian Order
which some religious order raised in the late 17th and early 18th century. This
is why I put the Cardinal in the command group. The cardinal figure is a Redoubt
Three Musketeers figure - it is supposed to be 28mm but is a giant and is actually 35mm
tall which suits my boys nicely. Every figure here except for the Cardinal is a
home cast figure made from a master I have made. The infantry figures and
standard bearer are from masters I made back in 1983 so they are ancient. The
officer with the sword is a master I made only a couple of years ago.
Saturday, March 30, 2013
Thursday, March 28, 2013
SACRIFICIAL OFFERING
Sunday, March 24, 2013
Britannia armed trawler
I though all pics of this had been lost but , a new computer and the things you come across.This was sold long ago but I do have another..and an MTB
Friday, March 22, 2013
OPERATION STARLIGHT 40MM GAME
Operation Starlight - 22 March 2013
The Team: Ian, Peter, Steve, Jim and Geoff played a
game at my place last night. Each player controlled two figures of a Special Forces
team. We used 40mm figures and modified Force on Force rules. The team had to
find a satellite which had come down in an unfriendly country. They had
to extract valuable data from the satellite then destroy it. They then had to
get to the LZ for extraction. They had 15 turns to do this. As it was the game
took a little longer 17 turns, and involved a few 'moments' that provided the
guys with challenges, but they coped well and all got through unscratched.
Perhaps the highlight of the game was when Peter took an impulsive pot shot at a low flying
helicopter with a 203 - hit it and then downed it! All of this was due to a
string of highly improbable dice rolls one after the other but who can argue
with the dice Gods. A scatter dice then determined where the chopper crashed and
the dice continued to provided entertainment by crashing the chopper directly on
to the bridge, blocking the most viable crossing point to the LZ. A truly
memorable moment! After much noisy recrimination and banter directed at Peter
the boys eventually worked out an alternative solution to crossing the river
which involved using a fisherman's boat. Around about this time an enemy armored car entered the table. Geoff and Jim gave it a fright with a well
placed 203 round and a near miss from a LAW but not before it had opened fire at
Jonas (Jim) with its 12.7mm. Lady Luck favored Jonas and not one round hit
anywhere near him - an amazingly fortunate thing for Jonas. Obviously rattled
the armored car failed its morale and retreated from the table not to be seen
again. Having constructed an improvised crossing point with the boat the team
scrambled across the river and deployed into the LZ. There was still one problem
in that a dug in enemy 12.7mm HMG covered the LZ. The pickup chopper would not
come in while that threat existed. Carlito using his moving concealed skills (other wise known as his sneak skills) crept right
up to the HMG pit and lobbed in a couple of grenades silencing the gun. An enemy
APC had by this time entered the table but obviously wary of what had happened
to the armored car deployed its infantry and advanced very cautiously down the
road. All too late though as the team had departed - mission accomplished.
One disappointment in the game, at least for me as
the evil umpire, was that I had arranged that two d10 should be rolled every
turn. If a score of 00 was achieved one of the team has been bitten by a snake
and had to roll on the casualty chart to see what effect it had on them - no one
got bitten!
Here is the table showing the entry point for the Team and the LZ
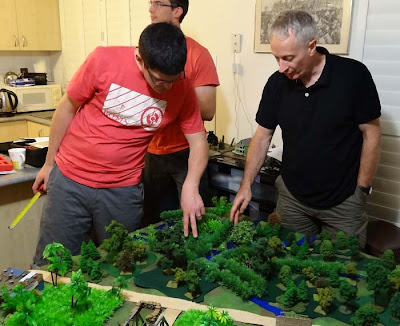
Two more views of the table
'Bob' and 'Jem' begin working on the satellite to extract the hard drives
Jim and Steve discuss the finer points of
moving through snake infested tropical jungle swamp
Peter persuading Ian and Steve
that crossing the bridge is their only option
Having passionately argued the case for
crossing the bridge Peter (as Boris) shoots down a helicopter which crashes
directly onto the bridge blocking it - well done Boris!
Geoff, Jim and Ian consider what on earth they
can do now that the bridge has been 'Borised'
An enemy armored car arrives and
tentatively enters the AO - Jim and Geoff dealt with it by firing a LAW and 203
at it. They did not managed to destroy it but did force it to retreat off the
table - giving the team a breathing space to plan their
escape.
Ian (Carlito) comes up with the idea of
grabbing hold of a local fisherman's boat to get across the river - after of course asking the fisherman
in a respectful and sensitive manner if he could borrow his property.
Steve had a revelation (he claims that did
not hurt but no one believed him) and the boat is used to bridge a narrow part
of the river - the Team uses it as an improvised crossing.
The pesky 12.7 mm HMG covering the LZ which Carilto silenced with grenades
The enemy regular troops finally arrive and advance very cautiously
Sunday, March 17, 2013
28mm AWI Battle Report in Pictures
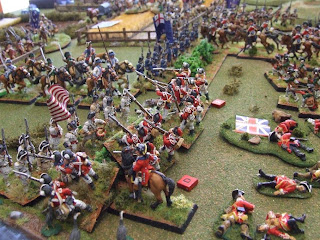
Yesterday, five of us gathered for a 28mm AWI game at my place. It was a fictional scenario called the Battle of Three Farms. The basic premise is that the American forces are protecting some supplies gathered from the area to feed the main army. The British are attempting to either stop the supplies from exiting at the ford (which they don't know about) and/or crush the rebel army. We used a modified free set of rules called Sons of Liberty.
The British (@3,500 men)have 3 brigades, plus a reserve, 3x3pdr guns and a cavalry detachment. The Americans (@5,000 men) have 4 brigades, plus 2x6pdr guns and a cavalry detachment.
Figures and terrain are my own (except the dead ones and some animals) and are a mix of Perry, Foundry, Eureka & Kings Mountain.
Lots & Lots of photos!
Cheers,
Mick
The residents of Chifley House
The Eastbrook Farm House
Clayton’s Farm (Note the home made lettuce patch!)
On comes the Elite Brigade of Grenadiers and Light Infantry
Surprise! Already within range of the American riflemen
Militia occupying a large field.
Some seasoned Continentals in the Eastbrook Farm.

Off go the supply wagons and escorts…
Jaegers skirmishing with the solid looking Rebel line.
Ooh, nice… the British main attack is launched on turn 3.
The Elite brigade starts deploying to counter the annoying resistance.
Guards, we’re guarrrrds! http://www.youtube.com/watch?v=s0KYh4J2trE
Getting stuck into the militia.
British 1st brigade pushing ahead.
A cheeky bunch of Continental Dragoons sally out and run over some grenadiers. While the Jaegers stay clear.
British have cleared out the Eastbrook Farm house in one go. Cows don’t seem to care.
And the large field goes next. Was too much for this cow.
The British, now cluing onto the American aims, launch an attack on the ford. The first supply wagon is on the top left of the picture.
The result of the British attack. Didn’t go so well.
Crappy E class troops are taking hits, but won’t run.
While their left flank willingly gives ground to 1/3 of the British troops
The wooded ridge is almost cleared.
And the British kept-a-coming…
The Americans reach their ‘line in the sand’ positions. But have bought enough time for the 2nd cart to escape.
The rather exposed and contracted American position awaits more attacks in the South.
In goes a light battalion attack over another set of obstacles.
In goes the Lt Dragoons for a successful 11th hour attack.
All too little too late though as the Americans claim victory by acheiving their objectives.
Subscribe to:
Comments (Atom)


