

Saturday, December 21, 2013
XMAS GREETINGS
Monday, December 16, 2013
MORE 28MM ROMAN TESTUDOS

I have finally finished the two sets of 28mm Roman
Testudo which I bought from Black Tree Designs about a year ago. It was a long
winded labor as I had to pin every shield then arrange each mini so that its
shield was in the right place. It took a long time to do this and I resigned
myself to just plugging away until it was done. Pinning everything and gluing it
with epoxy paid off as when I was varnishing one of the sets the ladder which
leans on the wall of the garage decided that it was going to fall onto the
figures and knock them across the concrete floor of the garage. When that
happened I thought that the set would have been smashed up but it was intact and
the only damage was a couple of minor paint chips off the rims of three shields.
I fixed those up easily. Well here are the two sets side by side. Woe betide any foe that thinks they can hide behind their walls from this lot.

Friday, December 13, 2013
28mm TESTUDO IN ACTION!

Here is my latest 28mm Testudo in a suitable setting.
The Minis are Black Tree design.
Sunday, December 8, 2013
OPERATION SCAMPER 28mm MODERN AFRICAN WARGAME
Here are some photos from Operation Scamper which we played today. The
Team had to extract three ambassadors - Sir Leslie Ponsonby (UK), Madame
LeBrusque (France) and Sir Les Paterson (Australia) from a situation in which
fanatical Militia were running amok. The team managed to do this without any
harm coming to ambassadors although the diplomats got plenty wet and dirty in
the process. It was not looking too flash for the Team at one stage but late in the game the Team managed to call in an airstrike (to do
this they needed a 10 on a d10) which took out the bridge and killed a large
number of Militia - one Team member then swam the river, recovered a boat on the far bank and
used it to get everyone across and to the LZ. They did this one turn late but
successfully called the Helo to delay its arrival for one turn. Two Team members
were lightly wounded and one was killed. The killed guy was wounded and
sheltering behind a jeep when he was swarmed by Militia. There was nothing anyone could do to help him at the time. The players all played members of the Team. The Militia
appearances and actions were all determined by umpire dice rolls. Sometimes the Militia did nothing but sometimes
they went crazy and attacked in a frenzy - this is what happened when they swarmed the wounded guys. Four local force soldiers were killed (three crew of
the armored car and one grunt) and two heavily wounded. Late in the game three
of the local force guys bugged out and stole a jeep then drove off the table - the
jeep was ambushed by Militia and one of the fleeing soldiers was killed but it was not the
driver and the jeep made its escape.
All the minis used in the game were 28mm. The table was about eight feet long and four feet wide. We used a set of house rules based on the Force on Force rules with a touch of Disposable Heroes. The game lasted for about five hours. Everyone who participated had a good time and enjoyed the game.

Some views of the table


What all the fuss was about!

The column enters the table


Militia rush out of the bush attempting to attack the column -
the Team made short work of them


Alerted by the sound of firing Militia emerge from the bush


More Militia move towards the action

The Team thinking about the best thing to do.

Still thinking about the best thing to do.


Crummp! The armored car is hit by an RPG and brews up. Damn!

The Militia swarm out and kill the two wounded men at the jeep.


Militia come out of the bush and discover a nice big truck sitting all alone on the road


The Team had succeeded in extracting the Ambassadors and the game was over but the real prize was the cool big truck now in the possession of the Militia - just the thing to impress the locals
Friday, December 6, 2013
28mm Napoleonics: 2nd game with 1 page rules.
Westphalians v Bavarians – part zwei
I decided to do a rematch using more or less the same troops as last
time but with an extended table. Some crossroads and a village are the main
features, plus a few hills and wooded areas. Main idea was to take and control
the crossroad. Each side had 2 infantry and 2 cavalry brigades. The Bavarians (with completed basing this time)
had a heavy battery as their main advantage. The Westphalians had a brigade of
heavy cavalry as their main advantage. The heavies ended up being the
difference. Very powerful against poor old light cavalry.
Brett came along and he controlled half the Bavarians. Richard placed
his heavy cavalry brigade directly in front of the Bavarian light cavalry as
soon as he saw the opportunity. The combat ended up being mostly one-sided and Richard
opened up a flank by turn 5 so another clear win to the Westphalians. Horse
artillery (1 per cavalry brigade) was effective and used aggressively on both
sides.
We discovered a few more clarifications were needed regarding the
countercharge sequence and evade distances but overall it was a smooth game.
Once the fighting starts, a lot can happen in a turn when morale starts taking
effect. The importance of having rear support and secure flanks kicks in. The
Reserve move phase is also important as it allows each side to move any units
that haven’t moved that turn to push into gaps or even exploit them. Brett and
Richard started to appreciate the skirmish rules a bit more and used them quite
well.
A couple of times we thought of adding a few interesting rules but then decided
it defeats the point of having a simple set of rules to play a complex period.
They may, one day, even get to 2 pages long.
But I think, at least for now, keeping it easy and fudging the tricky stuff is
good enough.
Cheers,
Mick

Westphalians lined up

Bavarians lined up

Table view

First turn movement

Advancing on the village

2nd turn movements

Westphalian Light Cavalry

Cheeky bugger Horse Artillery

Westphalians forming a battle line

Fighting starts for the village

Westphalian Heavy Cavalry push back the Bavarian Light Horse
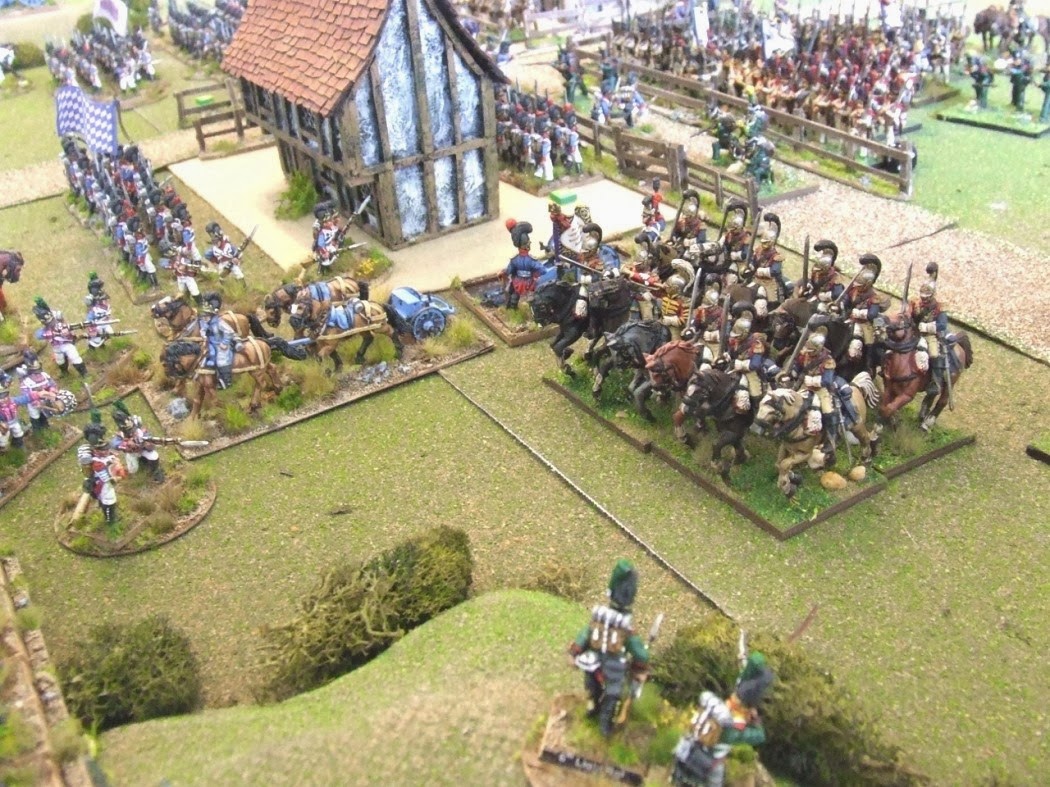
The gap created by the heavies

Firefight starting

Heavies pushing around the Lights again

Mirror image on this side of the village

Westphalian guns send a Bavarian line unit packing

Heavies dispatch one cavalry unit with ease – one to go


No more Bavarian cavalry on this flank as the Westphalians smell victory


One Westphalian unit routs – albeit temporarily

Reserves push into the stalemate fight for the village as the game is called in favour of the Westphalians

Notes on rules

The rules in their current form
Subscribe to:
Posts (Atom)