Showing posts with label WW2. Show all posts

Tuesday, September 4, 2018


28mm WW2 Spanish Blue Division Infantry  I have just painted. Note the Soviet SMGS, the Spanish preferred them. The figures are Bolt Action plastic WW2 Winter Germans.

Wednesday, August 30, 2017

15mm WWII Western Desert Game - using Blaze Away rules


I haven't had much of a chance to play many games this year, but I thought this was interesting enough to post on this blog. 
This was an introductory game of the Blaze Away WWII rules I ran on Sunday with two players . Both players hadn’t played much WWII and neither has played simultaneous movement games before.
Even though I was a bit rusty on the rules, and had a few new rules to remember, the guys picked it up well by the 4th turn and it was easy enough to run just using the unit sheets and reference charts.
The game unfolded as described below. 

Table set up for the game. A simple scenario designed to get tanks, recon, infantry, heavy wpns and ATGs involved.
Based around two small villages and depriving the use of the wells to the enemy. Classic early DAK vs British encounter with both sides roughly equal using my test-version point calculator. The British having a slight points advantage 457 to 452.


First moves using the hidden movement cards. A couple of patches of soft sand are spotted by the recon units as they advance. I made some fancy, laminated movement and order cards with a logo...just because it's a nice detail. You can see the reference sheet on the right of the picture.


British and DAK recon units swing between the villages and the Vickers tank gets off a lucky shot on the SDKFZ 221.
The British advance is revealed. That’s a lot of Crusaders (and rather too packed together for my liking), but most are only armed with 2pdrs. The unit of 4 2pdr portees covers a flank.

The DAK advance. Not as many, but these are elite troops. Both sides chose the same flank to put their tanks. This was good as a learning experience, but limited the tactical possibilities. Hopefully both players learned some lessons.


Some of the locals wandering around, seeing what all the fuss is about.

PzIIIs might as well be Tigers. Rolling really hot dice and carving up the crusaders at close and medium range. The initial carnage surprised the players to begin with, but they quickly understood the rationale and adjusted their tactics. The decision making with the order cards was starting to click.
The 2 pdr portees took care of the remaining DAK recon SDKFZ 222 as the panzergrenadiers in halftracks approached.


DAK 50mm ATGs and medium mortars deploy in the village. The PzIIIs with excellent crews and being stationary, got the double shot bonus and caused another round of carnage to the Crusaders. The Crusaders still got off enough shots to take out 2 PzIIIs and the PzII CHQ tank. This caused a drop in command rating (to Confident) and ended the double shot advantage. The 50mm ATGs were suddenly in a terrible position - they had no more targets. This bad luck tipped the game.
The Vickers and Bren carriers raked the pzgrenadiers as they dismounted. The British infantry took up strong positions in the village.


The ATGs mounted up and tried to move to a better position and the pzgrenadiers did the same. The few remaining Crusaders knocked out the last PzIII by swinging to a flank shot. The DAK mortar platoon got blown away by the British HMG platoon positioned cleverly in their village.


The same turn with the unscathed British infantry and the mortar platoon unable to get into action on time. A dud-day for mortars.

The remaining Crusader sqdn surges through the wreckage and turns the tide of the game. If they had fallen under the sights of the 50mm ATGs, it would have had a different ending. But, that’s how things can go. Using the D20 for armour combat adds more drama than using 2D10. The law of averages will usually work with 2D10. But with D20 you can score the miracle ‘20’ when you need a Hail Mary, or, have everything in your favour and feeling confident, then roll a 3…

After contaminating the wells with copies of Mein Kampf, the DAK commander decides to withdraw to minimise losses. The ATGs leading the skedaddle to safety.
A tactical victory to the British commander, although the points value of losses was fairly equal.

A fun game and all over in about 10 turns. It was deliberately uncomplicated to give them an idea of how it works while they got to blow stuff up on a Sunday afternoon.

Drop a message if you're interested in a copy of the rules. No pretensions of being anything fancy or different. They just fit my particular biases and idea of a fun WWII game.

Mick

Sunday, June 25, 2017

28mm WW2 Aussie Sniper Team

 This is the 28mm Australian sniper team from Eureka Miniatures.
It is a very nice set. 
Just don't let Smiley get you in his cross hairs!

Wednesday, April 19, 2017

WW2 Australian Commando

Just painted the first of the new Warlord Games WW2 Australian Commandos. Here he is. I got these last week. There are ten minis in the pack and I am looking forward to painting them.

Sunday, July 13, 2014

CHAIN OF COMMAND GAMES

We played two Chain of Command games this weekend. One was a game set in Crete 1941 and the other was defending Pegasus Bridge Normandy against a German counter-attack. Here are some photos from the games. All the figures were 28mm. The figures and tables were excellent.
 JU52s arrive over Crete- the models are 1/72 scale


 A New Zealand gun crew man a captured Italian gun

Greek soldiers and one New Zealander set up a Vickers gun on the roof of a building in one of the objective villages.
 Greeks soldiers defend the other village on the table

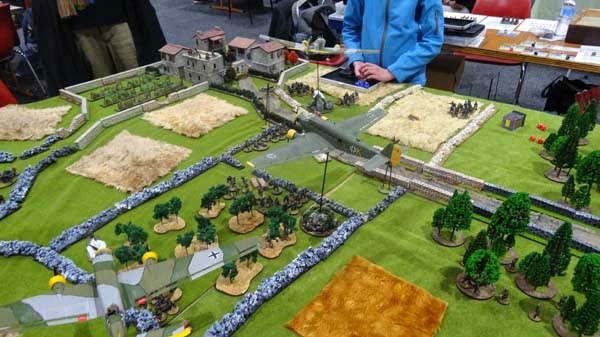
This is the Crete table from one end - the objectives for the Fallschirmjagers were basically each of the four corners of the table. To win they had to capture three of them.
 This is the Crete table from the other end
A marker is placed where the Fallschirmjagers want to land. What then happened was a scatter dice was rolled to see if this happened. If it did not then two D6 are rolled to determine how many inches away in the direction indicated by the scatter dice they actually land. A separate roll was made for the Fallschirmjagers weapon canister. Luckily my boys landed pretty well where I wanted them to, but others were somewhat scattered.
You can see my first drop was pretty well on the mark. I have placed a second marker for my next drop. When I rolled to check where it landed I rolled spot on the mark - it helps to be lucky!


 A Fallschirmager squads lands behind one of the objectives and overruns it.
Greek and New Zealand POWs are led away. In the image below you can see that one village being held by the Greeks is being hit hard. Eventually Greek morale collapsed and they surrendered. This gave the Fallschirmjagers two objectives. The third objective which was a hill held by the New Zealanders was just about to fall. The game was called at that stage and declared a German victory.
 This is the Pegasus Bridge game.
 A great model of the bridge.
This was a great idea and looked fantastic. The 'burning' accessory consists of an LED 'Tea Light' that you can buy in the $2 shops. Cotton wool is arranged around the light - held there by double sided tape. The wool is given a  light coat of black spray paint. Then a spray of matte varnish is applied. All you need to do is switch on the light and you get a flickering flame - it is brilliant! 

 The German counter-attack arrives and begins to push down the road.
 British Paras entrenched in front of the house and in the house resist the German advance.

 More Germans arrive and the house starts to get their attention.
The house is now getting some serious attention from the Germans. The Paras sheltering inside are being steadily chewed up.
The Paras in the house are eliminated the house is reduced to ruins. Shortly after the British commander on that side of the river is killed and British morale collapses. The Paras evacuate to the other side of the river.

 The Germans lay a smoke screen and push forward towards the bridge.

The game ends with the Germans occupying the objective on what is now their side of the river and moving up into positions for the next phase of the attack which will be directed at the bridge. The game ended at this point.