Showing posts with label Game Report. Show all posts

Saturday, March 27, 2021

15mm Napoleonic Battle - March Attack Redux rules

 15mm Napoleonic Battle - March Attack Redux rules

On Friday I rolled out my most recent edit of March Attack Redux and it was a game of firsts.

  • First time I had played this as a multi-player game (6).
  • First time I used my rebased and painted 15mm Minifigs armies.
  • First time that one player with 40 years of wargaming experience had played a 15mm game.
  • First time I used my home-made felt roads and tree bases. They looked pretty good!
The scenario is a slight adaption of the sample scenario in the original rules - Advance to Plancenoit, 18 June 1815

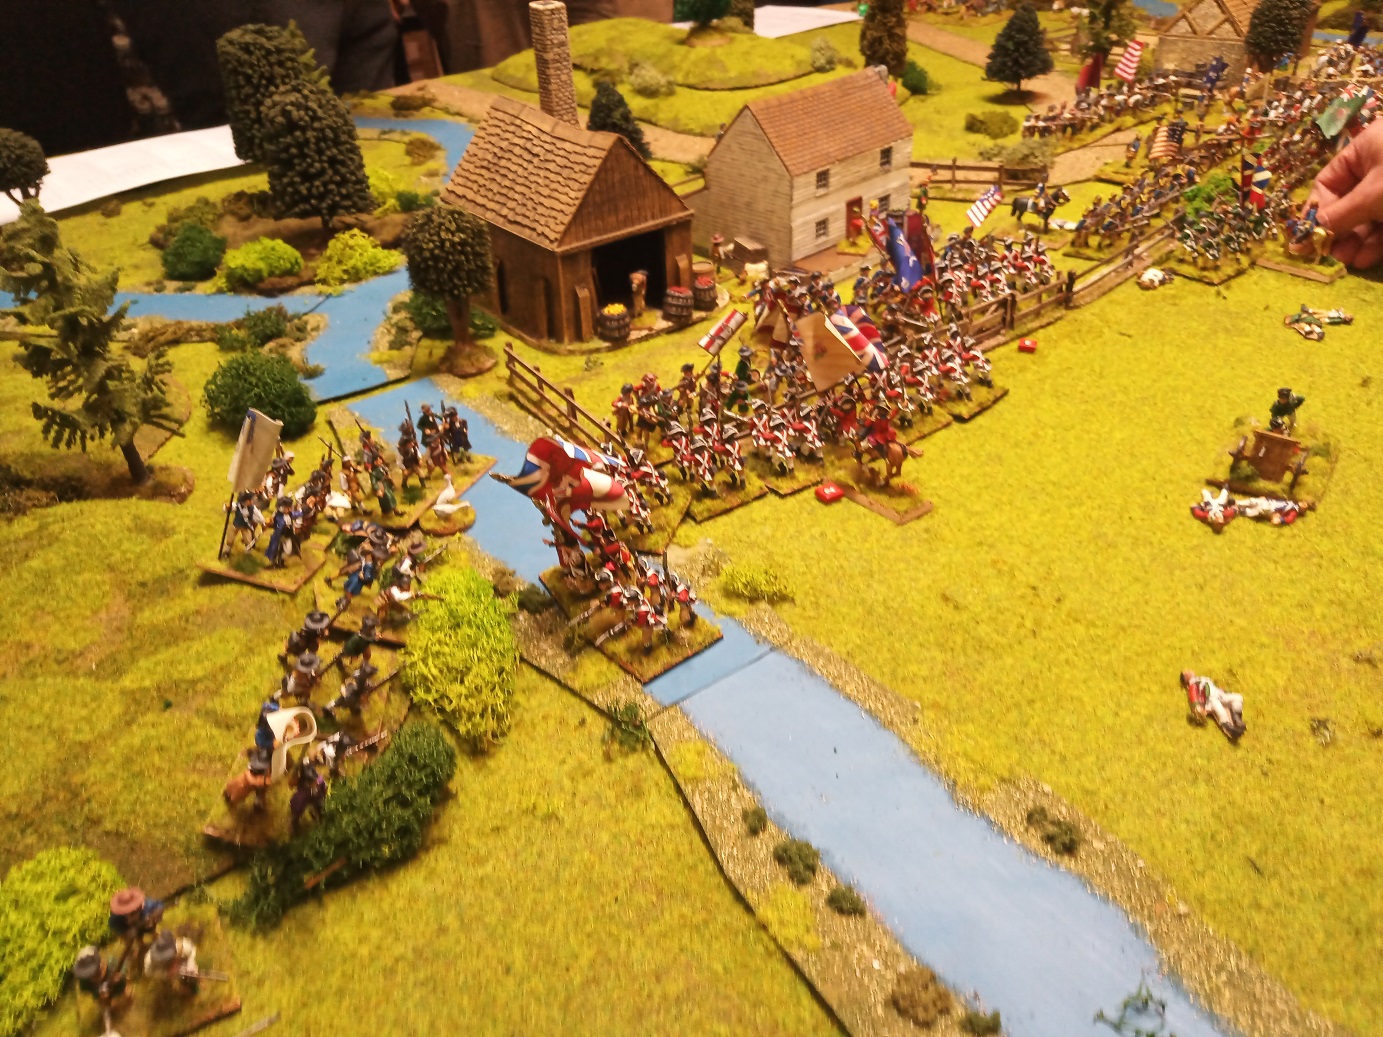
The battle involves a Prussian Corps advancing towards Waterloo while a slightly more weary French Corps attempts to hold them back. For this game I made the French-held crossroad the objective. The Prussians had to take it and the French had to hold it as long as possible.

For those that haven't heard of March Attack, they are from Crusader Publishing and are designed for players to control a Corps per side. Units being infantry battalions, cavalry regiments and artillery batteries. 

Being the first game, everyone had 1 or 2 divisions each.

Opening moves. Prussians pushing cavalry on the flanks and the infantry intending to punch the left of centre. Room was left in the centre for the artillery reserve to deploy once they arrive.
The French anchored their left flank on the town with the 20th division. Guns in the centre to deter a direct attack and the 19th division slightly held back to react to the direction of attack. The 2 light cavalry divisions were placed back on their centre-right.
Landwehr cavalry approaching the town defended by a French infantry division.
The Prussian Corps artillery arrives with an escort of Prussian grenadiers.
The 2 Prussian infantry divisions advancing to the designated focal point - one division supporting the other. Lots of landwehr infantry amongst the formations.
Prussian regular cavalry division anchoring and threatening the French flank.
French batteries cover the crossroad and assess target options; ready to deliver first blood.
Contact along the battlefield as the units become engaged.
The French 19th infantry division checks the Prussian 15th brigade as heavy skirmishing breaks out. The Prussian 16th brigade changes facing and the angle of attack to the crossroad.
Prussian regulars soak up the damage of the French skirmishing.
The French position is resolute to this point.
The French orders get confused/lost and a light cavalry division gets committed to attacking the landwehr cavalry. 
Situation at the end of game.
Fast forward several turns and we can see the Prussians have turned the French right flank. Cavalry in the rear is not good.
The Prussian light cavalry defeated a French light cavalry division and are now free to harass the rear of the position.
The French infantry division has broken after charges by the Prussian infantry. They exchanged musketry for a couple of turns which weakened both lines.
The French batteries have suffered badly from the Prussian Corps artillery and now break as the Prussian infantry hit them. Crossroads secured and a rare Prussian victory!
Remnants of a French cavalry division that could not be rallied.
The second French cavalry division took heavy casualties and retired to the reform area. They can now at least cover the infantry retreat.
French 20th infantry division hold their position, virtually unscathed. However the position is now untenable and they withdraw in good order.
French artillery are battered and limber up to save the guns.
The landwehr cavalry division has taken damage, but can't do much except watch the French pull back.
The Prussian Corps artillery enjoyed their dominant position and suffered little.

The rules played well and they have a great Napoleonic feel. Really interesting decisions have to be made and timing was an important component. It might take 2 turns to react to an event and commanders have to decide whether to kick on with the plan or make significant adjustments.

The game itself took a lot longer to complete being the first time we had played them as a group. Lots of good questions and they wanted to have an understanding of options before going too far ahead. Players were generally cautious before really committing to a fight.

The points that held up the play were, order selection (and what can/can't be done), artillery unlimbering and firing, the difference between strategic and tactical movement and what can happen in those phases, and the charge sequence.
Those points were all eventually resolved and we progressed well as each were clarified. Towards the end we were getting through the turns more efficiently. Everyone looks forward to trying them out again. The rules give a really good mix of playability and period feel.

Main concepts:
  • These are Corps/Army level scale - Each player will usually have a corps. However, we started with a division or two each.
  • Each unit is a battalion/battery/cavalry regiment but are organised into 'Major Formations', known as MF (brigades to divisions).
  • Each unit has a Combat Value (CV). The combat value determines how much punishment a unit will take before breaking. High CV is better than low CV.
  • CVs get eroded through firing, melee and skirmishing. They break once they reach 0.
  • If the Major Formations lose too many units, they too will break. So managing your weaker units is important.
  • There are two levels of Disorder. D1 and D2
  • There are two main phases: 
    • Strategic - stuff happens at the macro scale (outside 9" of the enemy)
    • Tactical - stuff happens at Engagement range (within 9" of the enemy)
  • Each MF has a set of orders they have to follow. Change of orders is required to do different actions.
  • Skirmish ability is rated by nation and date. Post 1808, most nations have improved their skirmish doctrines

Summary of main changes to original rules:
  • Turn sequence updated to reflect newer rules.
  • Skirmishing - this was originally an abstracted phase that involves maths and was boring and did not, in my opinion, reflect the point of skirmishing. Now the skirmishing can be seen and each commander must make decisions on how many skirmishers to commit and for how long. This can be a wasteful drain on resources and achieve nothing (as quoted by an Austrian General) or be a real PITA if left unchecked.
  • Infantry base sizes have been halved to allow for more realistic formations and skirmishing options.
  • Cavalry and artillery bases have been doubled to better reflect actual frontages - and it looks great...
  • Added rally points for retiring units. Broken units have predetermined areas to rally where officers run around reorganising units at the rally point.
  • Using historical formations and benefits from using those formations. They were used for a reason, but many rules ignore this and allow "wandering battalions" that all flit around doing their own thing.
Some things I may have borrowed from other rules.

Cheers,
Mick

Sunday, September 13, 2020

28mm AWI Game - Battle of Grey Plains 1776


Battle of Grey Plains 1776
 

   Before the armies arrive...

Below is the game report of my fictional Battle of Grey Plains from last Friday evening. Loosely based on the Battle of White Plains. We had a new guy, Alex, turn up and I thought this would be an interesting and fun first game.

With seven of us available for the game, I decided that six players with three per side would work well. I would umpire to keep the game moving along and make the occasional impartial decision. We used Fife and Drum rules by Jim Purky (aka Der Alte Fritz) because they are simple, fun and work well for multi-player games.

Shoeing the horse in case the family has to move to safety

The villagers of Grey Plains leave their dwellings as troops gather before them. Not yet aware that history will be made at their front doors.

The scenario was simple enough. I allocated three objectives; the main hill and the two BUA sections of the village. Which ever side could control and/or occupy any 2 of the 3 objectives would win. I've abbreviated the objectives to O1, O2 and O3 for the report. I allocated the players to each side and they drew cards to see who be in command. Brett was General Howe, the British commander (dubbed "Lord Grey") with Richard and Rohan. Ma'te was General Washington with subordinates Mark and Alex. The British are attacking and the Americans are defending the objectives. The American forces can fortify part of the line (with felled tress) and choose to fortify the gap between the 2 BUAs. The Americans have a chance of late reinforcements, but only the umpire would know if or when they might arrive. The game would go for at least 5 turns, with a possible turn 6 if the result was in the balance.

The Armies:

Great Britain (and allies)

1st Brigade - 3 x British battalions (regulars)

2nd Brigade - Highlander battalion, converged Light infantry battalion and converged Grenadier battalion + 1 6 pdr gun.

3rd Brigade - 4 battalions of Loyalists + 1 amusette (1pdr)

4th Brigade - 2 Hessian battalions, Jager detachment w/ amusette + 1 medium gun

Supported with a Light Dragoon detachment

American Forces

1st Brigade - 4 x Continental battalions + 1 6pdr gun

2nd Brigade - 2 x Continental battalions, 2 x militia battalions +1 6pdr gun

3rd Brigade - 4 battalions of militia (large units)

4th Brigade - 2 Continental battalions (reserve, arrives turn 4 on 7+ roll)

Supported with a Light Dragoon detachment, 2 riflemen units and 2 light galloper guns.

Armies are set up. Objectives are numbered. British win initiative and move first.
 
A group of American Riflemen occupy woods near the river

Continentals have occupied and barricaded Objective 3(O3)

Felled trees form defensive lines between O2 and O3

 2 Battalions of Continentals in reserve

General G. Washington oversees things behind the centre position

Continental Dragoon detachment held back, for now

Mixed Continental and Militia brigade on O1

Hessians take up attack formations on a flank

Jagers ready to advance through a small wood (always one guy facing the wrong way...)

Elite brigade lined up to punch a hole in the defences.
Further along are the Loyalists.

British regulars in line. Next along the line, but not pictured are the Light Dragoons.

Time to advance! Hessians on the move

Jagers scootch forward

The British battle line advances in fine order

Loyalists aimed at the centre

Jagers take first blood!

Continental artillery strike true on the Loyalists

Start of turn 2. British win initiative again

Jagers lead the attack. Continuing the harassing fire as they go.

Converged Light battalion goes to skirmish formation and begins to probe the defences with musketry. Artillery has unlimbered in front of the defenders of O3. This looks like it could go badly for the Americans.

Continental reserve battalions sense the danger and rush to offer support in O3

The British line now extends from river to river

The reserve militia unit moves forward. Ready to fill the ranks of the fallen - or those that skedaddle.

A neat, supported advance on the left. Good show and all that!

The Continental units on O1 decide that they will be needed to defend O2. (And someone had to leave their measuring tape in shot)

Start of turn 3. Another initiative win for the British.

Jagers move forward and pick off more riflemen. The riflemen instead target the Hessian line.

Jagers only know one way - to move forward. Their amusette gets in close range while the artillery scores hits. Getting bloody now.

The Converged Lights continue to cover the advance, but are starting to take damage. A base has already been shot away.😲

Loyalists are taking the brunt of artillery and accurate militia volleys.

Hits are mounting on the Loyalists and forcing morale checks. They re-dress ranks, then march on - for the King - or whatever...

The British regulars begin to suffer from the persistent fire from the galloper guns. They fire a volley back and see militia begin to fall.

Start of turn 4. Wouldn't you know? British win initiative again...

A shaken Continental battalion fails to rally, leaving a disturbing gap in O3

A view from the Rebel lines

Hessian contingent moves forward. Pressuring the Americans.

The Grenadiers charge! The coup de gras?

Close up of the charge

The Light troops form line and also charge in

As do some Loyalists

Likewise the British regulars charge! A general attack along the line.

One battalion of regulars turns to hold the flank against some militia units on O1

The forgotten flank of O1. Some riflemen and both sets of Dragoons face off.

General Washington rolls a 9 (!) for reinforcements. Here they come! A great sign for Ma'te and the Americans.

American view of the attack from O3

The awesome sight of the general attack.
General Howe's A3 rules sheet dominating the British rear...Brett doesn't wear glasses but likes big print...

Detail of the attack from O1 and O2

Jagers inflict significant casualties on the riflemen, but they hold!

Both sides suffer in the bitter hand-to-hand fighting. Here I forgot to enforce the rule where both units fall back for drawn combats. I think it favoured the Americans in this case...oops🙀

Here we also mismanaged the rules for artillery in melee. Allowing the gun crew to last longer than they should have. Another bit of bad luck for the Brits.

The British regulars dispatch some opposing militia. But others hang on.

The far flank riflemen pick away at the British Light Dragoons. This emboldens the Continental Dragoons.

Another view of the O2 sector

American view of the centre

These militiamen have had enough for today

The geese don't seem bothered

Turn 5 and crunch time for everyone. The Americans finally win initiative on this crucial turn. They take full advantage!

Charges roll on

Hands of the gods

Jagers attack the remaining riflemen. Riflemen die, but they refuse to run. Give those men medals!

Hessians charge in. Trying to take O3 at any cost.

As do the Grenadiers

The centre is finally giving way to the British

General Howe personally directs the attack on the guns. They soon give way.

Mark's giant hand, managing his casualties in the centre

However, he is not too concerned now that the reserves have come into view

The morale of the British Light Dragoons suddenly collapses. Allowing the Continental Dragoons to swing across the O1 flank and threaten the British flank and rear.

The milita on O1 spread out to fire on the thinning British units

The Loyalists have had enough. They leave a yawning gap in the centre and the British regulars now have two exposed flanks.

Two American battalions flee but also break the resolve of two British regiments. O2 hanging on by a fingernail.

The thin red line can't get any thinner

Another militia battalion breaks and Washington can do nothing to rally them. The reserve militia look nervous. The converged Lights are now spent from the effort.

Some success for the Hessians. They gain access to O3.

The Grenadiers roll badly and can't exploit their advantage as the Continental morale holds again!

A view of the centre and fresh troops ready to face exhausted ones.
This general likes to be seen at the front with his men.

The shaken and routing British left flank

The human (well, metal and resin) cost of Grey Plains village

Not much that General Howe can do with his roughed up units. He sends messages to his subordinates to call off the attack. 
"Now", he thinks to himself, "How can I explain this to the King in dispatches?".
"Ah yes, 'A minor action of no consequence in a place of no significance'". Howe removes his wig and runs the palm of his hand over his head. "That will do. By the time he reads that, it might not matter".

The Continentals shout across to the Grenadiers, "That's what you get when you tread on me, suckas".

The Jagers haven't taken a casualty but have respect for their enemy who never gave up.

Washington is pleased to have held on for so long. Now off to Fort Me! - aka Fort Washington.

A complete 3-0 victory to the Americans.
But it could have gone either way, which is usually an indicator of a good game.

The game was quite fun and it was tense and in the balance until the final turn. The defenders suffered but made the British suffer at least as much. 
 
The British plan was not as coordinated as it might have been. They decided to take O2 and O3 but didn't focus enough on those areas. Taking an extra turn to soften the enemy with musketry may have made a difference. The error and ommision of rules at important times was significant as well.
 
The Americans handled the battle well. They held troops back and plugged gaps with just enough reserves to hold the defensive line. The arrival of reinforcements made sure they would remain secure until nightfall.

Cheers,

Mick