The boys played Operation Kimba last night. We used Force on Force rules with 40mm figures. Here is part of the briefing the lads received prior to the game and a game report:
Situation:
The government of Zangora led by President for life Rastaman Kimba has been overthrown in a military coup led by General Humba Mbopo. President Kimba is a despot and demagogue of the first order but a pale shadow of what General Mbopo offers to bring to the nation. In addition to his decidedly unsavory character Mbopo has made public statements of his eternal friendship, offered sanctuary and active support to most of those on our nation’s top terrorist black list. Despite being of equally unsavory character Kimba has no such intentions. It has therefore been deemed to be necessary to preserve the life of Kimba so that a counter coup can be organized by Kimba’s supporters, who are present inside Zangora but disorganized and poorly armed at the moment. To this end your Special Forces team was dispatched to secure Kimba and move him to a safe haven. Your team succeeded in securing Kimba after landing inside Kimba’s presidential compound while it was under attack from Mbopo’s troops. During the extraction your CH-47 was hit by ground fire but, although heavily damaged, was still airworthy. Flying with consummate skill the USAF SF pilots managed to coax the CH47 to a remote locale near the southern coast of Zangora before the CH47 was forced down. Despite the pilot’s skill the landing was rough and there have been casualties – one pilot is injured, and one Delta team member severely injured. Miraculously the rest of the team, the second pilot and President Kimba are unharmed. You now find yourself scrambling from the wrecked CH47 in hostile country. Your location and situation is known and a relief force has been dispatched from USN elements currently off the Zangoran coast – ETA 90mins. The nature of the terrain dictates that the LZ for rendezvous with the relief force is 600m to the south of your current location.
Mission:
Absolute mission priority is to secure and extract President Kimba to the LZ RV by no later than 0930Z hrs. You are to sanitize the site of the downed CH-47. Leave nothing that will identify or compromise your nation’s involvement in the mission. You will leave no living man behind.
The game:
After working out how much time they had to do the job (18 Turns) the team decided that they would cross the creek - if they could find a place to do so and trek through the rainforest rather than try their luck in the village and cross the bridge. They dragged along Kimba and carried their wounded comrade. Meanwhile angry Holy Ghost Resistance army fighters began to run onto the table from several directions. One of them climbed up into the church tower and began taking random pot shots at everything and anything he could see - including his own people. A couple of brave HGRA lads did fire at the crashed CH47 but hit nothing - Peter used his sniper team to silence these fellows. The boys moved as quick and carefully through the trees as they could. They almost had an encounter with an angry water buffalo but avoided doing so. They were attacked by HGRA fanatics (The Chosen Men of God) who actually stuck around for three turns and caused one of the Delta squads to go to ground for that time. That was until the Chosen Men -who were bullet proof of course- decided that they would rush straight at Delta but were all killed doing so. Another squad of HGRA tried to engage the tail end of the SF column but Peter and his rearguard made short work of them. All the time President Kimba was being 'escorted' along with all eyes on him to ensure his safety. Eventually the team reached the LZ with the relief force only a few minutes away. It was at this time that the armored column of General Mbopo arrived. This immediately attacked any HGRA it could find and the HGRA fled from the table. Mbopo turned his attention to the LZ and two armored vehicles moved to engage the helicopters which were at that time landing. The first of these -an EBR armored car- was made short work of by USN airpower and a squad of soldiers suffered the same fate from the combined firepower of Delta and Helo door gunners. More soldiers moved up and these ones proved to be very resilient - surviving three morale tests with no problem. Two of the Delta who had put themselves on the side of the LZ closest to the enemy were in big trouble and both got hit but thanks to the nearby presence of the Delta medic ended up suffering only light wounds - it could have been much worse though. The show was not quite over yet, as more armor appeared including a tank and began moving along the road in the direction of the LZ. Calling in another airstrike saved the day when in one gun run -and good dice rolling- every armored vehicle which had no choice at that time but to be stretched out along the only road- was knocked out. With that the relief force Helos lifted off and the mission was accomplished event though President Kimba was complaining bitterly that is hand crafted Italian shoes had been scuffed and his Rolex had been scratched in the 'debacle'.
I ran the game using a script to manage the enemy. All the players were SF with their own two figures to command. I read the script for that turn out at the beginning of each turn. The 'enemy' did what was on the script, not what I thought they should do according to what was happening on the table, although there was some discretion allowed. There were random events which had odd things happening, hints at what might be occurring off the table from distant sound heard as well as a couple of contacts made by the SF boys with local people who had their own agendas. There was also an angry water buffalo lurking in the scrub, but luckily the lads managed to avoid this, although it came very close at one time. The boys had to work together to achieve their goals. They did this quite well. All said they enjoyed the experience and could not wait for their next 'deployment'.

The team L-R: Steve (USAF/SF), Pete (Delta), Peter (Delta), Ian (Delta)

President for Life Kimba - the great man himself.

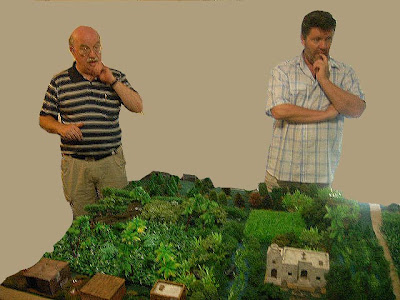
The 'battlefield'.


Down in the weeds and getting ready to get out of Dodge. President Kimba - left of center - waits impatiently for the boys to save his ass!

Into the bush - best to keep out of sight.

The Holy Ghost Resistance Army rushing out to save their 'Messiah' Rastaman Kimba who has been kidnapped by the servants of Satan!

More HGRA lads with a truck load of beer.

The HGRA get serious!
What the hell do we do now? Surely there is a better way to make a living?

Careful analysis, studied appreciation, detailed planning - then just kill everything that moves!

One of the relief Helos arrives at the LZ - the boys move as quick as they can to get on board.

The armored might of General Mbopo arrives - time is running out for the the good guys!

Luckily for the lads on the ground USN air-power made sort work of Mbopo's armor - The Navy fly boys luckily arrived in the nick of time to save the day.

 The table with the Roman army fast approaching the Dacian city walls on the right.
 The game in progress. The Romans have surged ahead and are at the base of the city's walls. In the distance the Dacian army rushes on to the table.
 Battering rams go to work. Dacians inside prepare themselves for the coming storm.
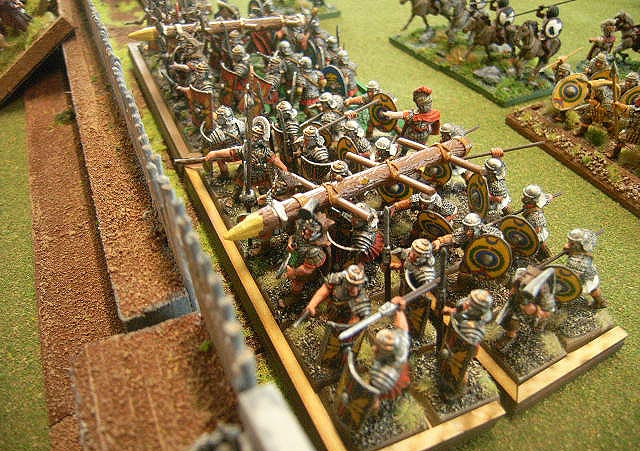
 A fierce fight between Roman and Samartian cavalry eventually saw the Romans victorious.
 The Dacian horde surges forward to engage the Romans.
 Throughout the game Roman artillery inflicted casualties on the defenders of the city walls, forcing them to eventually abandon the walls.
 The walls are breached. The first Romans through were destroyed.
 Fresh Roman troops followed immediately and they wiped out the Dacian defenders. With that the game ended.


